Saturday, October 25, 2014

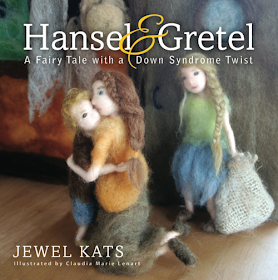
Giveaway! Win a Copy of Hansel & Gretel: A Fairy Tale with a Down Syndrome Twist

THE GIVEAWAY HAS ENDED.


Two random winners have been chosen. The first place winner is Carole Amai. The second place winner is Jade O'Shea.

A great big thank you to everyone who participated!

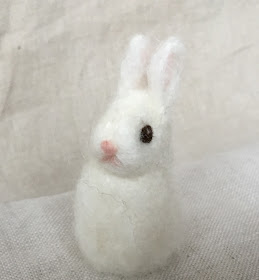
Win a copy of Hansel & Gretel: A Fairy Tale with a Down Syndrome Twist and a needle-felted bunny character that was featured in the book. The book is a first of its kind, illustrated in wool through needle felting technique. 
Not only is the illustration in this book one-of-a-kind, but also the plot of the story is far from ordinary. This adaptation of the classic Grimms’ tale includes the wicked witch and the poor siblings in search of food; but in this version Jewel Kats’ main character, Hansel, is a mischievous, yet courageous, five-year-old boy with Down syndrome.


To enter you must comment on this blog. 

You can gain an additional entry by pinning on Pinterest one of the photos on this blog and including the link in your comment. You can also gain an entry by sharing on Google+. A third way to gain an entry is by tweeting this blog and including the Twitter link.

First prize: Hansel & Gretel: A Fairy Tale with a Down Syndrome Twist signed by me, the illustrator, plus a tiny needle felted bunny that appeared in the book.

Second prize: A copy of Hansel & Gretel: A Fairy Tale with a Down Syndrome Twist  signed by illustrator.


The contest runs for three days from Saturday, Oct. 25, 2014, at 12 p.m., noon, until Tuesday, Oct. 28, 12 p.m., CST.


Needle felted bunny by Claudia Marie Felt


Hansel & Gretel: A Fairy Tale with a Down Syndrome Twist 


Hansel & Gretel: A Fairy Tale with a Down Syndrome Twist 


Hansel & Gretel: A Fairy Tale with a Down Syndrome Twist 

NOTE: This promotion is in no way sponsored, endorsed or administered by, or associated with, Facebook.

Tuesday, September 30, 2014

First Ever Children's Book Illustrated in Felted 3-D Wool


A year ago, author Jewel Kats discovered my needle-felted animals and characters through my Etsy store. She became an admirer of my work and asked if I would illustrate a book for her.  I read the story; it touched my emotions and made me cry. I said "yes" and started on a journey.

Hansel & Gretel: A Fairy Tale with a Down Syndrome Twist childrens book

Hansel & Gretel: A Fairy Tale with a Down Syndrome Twist


Now, the thought of illustrating a children's book was not a foreign idea. I have had daydreams about writing and illustrating a children's book for many years. In fact, I have written a few that are stashed away. The illustrating part was a little trickier. I've had artistic talent since childhood when I would wile away the hours drawing. I later dabbled in watercolor and colored pencils. The problem is that I never stuck with any medium long enough to become really proficient.

Then I found needle felting--my muse. (How I found needle felting is a story for another day.) I became obsessed and found that my animals, angels and fairies could touch people and bring them joy.

When Jewel asked me to illustrate a book, I first considered posing my needle-felted characters among doll furniture. However, I thought it would be much more interesting if I created all the scenery in wool. Wool has a soft and dreamy quality that differentiates my style.

After I illustrated the first book (which has not yet been published), Jewel asked me to illustrate a second. I read the book, and again I cried -- I'm a bit of a softie. I said "yes," and created the illustrations for Hansel & Gretel: A Fairy Tale with a Down Syndrome Twist.

The book is available on Amazon and Barnes & Noble.

The illustration process has been quite an adventure. Although most of the illustration is needle-felted, I have also used some wet felting and a technique in which the wool is pressed together. My brain has gotten a workout figuring out how to create a fireplace, a forest, candy houses . . . The illustrations are mostly wool, although I have used some wood.

I am amazed to have created this illustration style. I'd love to hear your comments.


Needle Felt Book Illustration by Claudia Marie Felt

Illustration from Hansel & Gretel: A Fairy Tale with a Down Syndrome Twist


Fiber Art Book Illustration

Illustration from Hansel & Gretel: A Fairy Tale with a Down Syndrome Twist


I will include an Amazon link to the book when it is published. Here is some information from the press release:

Jewel Kats Tells Adventurous Tale of Hansel, a Brave Boy with Down Syndrome
Ann Arbor, MI – From the award-winning author of Cinderella’s Magical Wheelchair: An Empowering Fairy Tale comes another empowering children’s book, Hansel & Gretel: A Fairy Tale with a Down syndrome Twist (Loving Healing Press, October 2014).
This adaptation of the classic Grimms’ tale includes the wicked witch and the poor siblings in search of food; but in this version Jewel Kats’ main character, Hansel, is a mischievous, yet courageous, five-year-old boy with Down syndrome.
Young readers of the book will get the message that children with Down syndrome are capable and can achieve extraordinary success with determination. Hansel’s story will also teach by example that people cannot be judged by appearance; a princess or a hero can be hidden within. Jewel Kats’ insightful story is brought to life with enchanting illustrations in wool by fiber artist Claudia Marie Lenart. Also making the book special is the dreamy style achieved by the artist with needle felted wool – a first in childrens’ book illustration. 
Praise for Hansel & Gretel: A Fairy Tale with a Down syndrome Twist
“I love that this book addresses not only the low expectations that society has of kids with Down syndrome but that the Mother has as well.   What a gifted author to see past the diagnosis and tell a magical story of potential and belief!” 
––Nancy Gianni, Founder & Gigi’s Mom, GiGi's Playhouse: Down Syndrome Achievement Centers

“This story would help young readers look beyond disabilities and focus on the characters of those who have special needs. Claudia's breathtaking illustration take this beloved tale to a whole new level.”
––Shaila Abdullah, author of My Friend Suhana


Children's Book Illustration in wool by Claudia Marie Lenart Down syndrome

Illustration from Hansel & Gretel: A Fairy Tale with a Down Syndrome Twist


Saturday, September 20, 2014

Custom Dog Pet Portraits

Needle Felted Dog Sculptures

Needle felted white husky pet portrait
White Husky, Large Sculpture


I love dogs, always have. When I was a child, we moved to an apartment where I could no longer have a dog. Our Tammy went to live with grandma and I was so sad; I yearned to have a canine companion. As an adult, I've always had dogs, as many as three at a time. I currently have two--Lily, a husky mix, and our puppy Angelina, a border collie/Aussie mix.

When I create needle felted dog portraits I spend a lot, lot of time studying photos of the dog as well as photos of the breed from every angle. I grow to love the dog and feel as if I know him/her.

I always start with the face, being certain the position of the ears, eyes and nose are correct. The eyes take the most time. I create them in layers--iris, pupil, light dot and then line the eyes and poke, poke, poke until it is shaped and sized correctly. The legs require multiple layers. The final layer of the dog is usually soft alpaca wool.

Sometimes, the pet owner sends me fur from the dog and I incorporate that into the sculpture. Most often, I mix in a little of the fur with alpaca. I believe it brings a little of the dog's spirit into the sculpture. When I created a Bouvier des Flandres I was sent a large envelope of the dog's fur and I was surprised just how well it felted; in fact it was nearly indistinguishable from the rose grey alpaca.

Needle felted labradoodle
Labradoodle

Quite often the portraits are of dogs that have gone over the rainbow bridge. It gives me a warm feeling to know the sculpture brings comfort to the dog's companion.

Needle felted golden retriever
Golden Retriever
Here is what one customer said about her pet portrait:
OMG.. I can only say CLAUDIA could not have recreated my Precious Calli any better. I opened the box and cried and cried because I felt as if I had my Calli back in my hands and back by my side again! Just a smaller version! ;) AMAZING work!
Needle felted miniature collies and shelties
Tiny collies

Hope you enjoy my dogs!
White German Shepherd


Wednesday, April 2, 2014

Nursery Rhymes, Lullabies are Joyful and Brain Building for Children and Parents


Sharing nursery rhymes with young  children is a joyful bonding experience and it also helps children with language and later reading skills.

Three Little Kittens Needle Felted Finger Puppets
Three Little Kittens
When my son was small, we read a thick nursery rhyme book, every night at bedtime. We still have the book, which is in tatters along the edges. All those wonderful memories I just can’t part with. As he got older, that bonding experience matured into fairy tales, then C.S. Lewis’ tales of Narnia, and we spent years on a journey alongside Harry Potter.

One of our favorites: Come Out to Play
Girls and boys, come out to play, 
The moon doth shine as bright as day; 
Leave your supper, and leave your sleep, 
And come with your playfellows into the street.

I remember taking him out on the back porch on a warm night and reciting I See the Moon—
I see the moon and the moon sees me. God bless the moon and God bless me.

I enjoyed the way the rhymes fell off my tongue. While my son and I were relishing warm and fuzzy moments, we were preparing him for later success in reading. Sharing nursery rhymes is a strong predictor of future reading success.

“Nursery rhymes and other repetitive language help children learn to think their way through a word sound by sound in the order in which they hear it,” says Dr. Schickedanz. This ability, known as phonemic segmentation, is best predictor of future reading success, she said in an issue of Parents magazine.

Weave nursery rhymes into the fabric of your young child's life. Reading or reciting nursery rhymes is a comfortable bedtime routine. I would always end the bedtime reading with nursery rhymes or lullabies that encourage sleep—Rock a Bye Baby, Wee Willie Winkie, and Diddle, Diddle Dumpling My Son John (that really is my son’s name as well.)


Nursery rhymes aren’t only for bedtime. You can also reenact the nursery rhymes during the day; I especially recall cantering around the kitchen to This is the Way the Ladies Ride.

Needle Felted Mouse for Hickory Dickory Dock
Hickory, Dickory Dock
Another fun way to share nursery rhymes is with finger puppets. The small soft, wool finger puppets are a nice way to share cozy moments. My son and I also spent many hours creating stories with finger puppets and bendy dolls. Creative storytelling is another fantastic brain-building activity. But that subject is for another blog.


Please check out my finger puppets in my Etsy store. I am also available to make custom orders.

Needle Felted Peter Cottontail Finger Puppet
Here Comes Peter Cottontail


LIttle Dog Finger Puppet
There Was a Little Dog
White wool bunny finger puppet
White Bunny Rabbit

Prince and Princess Finger Puppets


Wednesday, January 8, 2014

Rainbow Needle Felt Wool Painting Tutorial

Bring hope and light into your home with an ombre rainbow wall hanging. This is a very easy needle felted project.
I made this rainbow artwork as a backdrop for the cover illustration for a book I worked on in the fall with author Jewel Kats.
After the illustration was done, I loved the rainbow so much and I used it as a backdrop for my needlefelted unicorn in my Etsy shop, Claudia Marie Felt.  I am planning to hang it soon.


Here is what you will need to get started:

1- 2 ounces of Romney wool roving

Wool dye, or food dye

A sheet of 100 percent wool felt

A piece of foam that is nearly as large as your wool sheet

Felting needle

I used Romney wool because it has a nice sheen and you can spread the fibers very thin without getting a stringy look.  The amount of wool you use depends on the size of the piece, but if you have more than needed you can always use the lovely colors for another project.

The dye I use is Greener Shades, but I have also created ombre rainbow wool with food dye. The food dye was easy to use because it did not require a dye pot, just a number of bowls with hot water. However, I prefer the more natural tones I get from Greener Shades.

Rainbow with food dye

Rainbow with Greener Shades

Dyeing Your Ombre Rainbow

Separate your wool roving into 7 even strands. If you are using wool dye with many color choices, you can simply choose to dye the wool the exact shades from the container, but it can be more fun to mix them yourself. You will need blue, purple, red, orange, yellow, green, turqouise. 
When dying with wool dye, you may find it more efficient and less wasteful to create your own colors, rather than discarding the dye bath and starting new each time. For instance, you can dye your yellow and then add some red for your orange dye bath. Likewise, after you have dyed your green wool, add some blue for turquoise. 
With food dye, it is easy enough to have 7 bowls. For food dye, just fill 7 bowls with very hot water and add the food dye. You may want to test the colors with a wisp of wool or a Q-tip. 

To get an ombre color, put 1/3 of the wool strand in the dye pot or color bowl and leave it there for several minutes. (If you are dying in a hot wool pot, do not hang the wool over the side; it will singe.) continue to dip the next one third of the strand into the dye bath and leave it there for a couple of more minutes. The last one-third will just get a quick 30 second or less swirl in the pot.  
You will need to determine for yourself the exact length of time to leave your wool dyeing as it depends on many factors--dye strength, type of dye, etc. 

Hang your 7 colors of ombre dyed wool to dry. 

Creating a Rainbow Wall Hanging
Lay out your sheet of wool on a piece of foam. 
Arrange your strands of dyed wool in order -- Red or Pink, Purple, Blue, Turquoise, Green, Yellow, Orange. It doesn't matter which you start with. 
You will want to arrange the strands in a curve or arch -- be creative!
After you get your basic shape, gently pull the fibers of one color over the other. For instance, a thin edge of green can be pulled over the yellow, creating a lime shade. By doing this, you will have more than seven shades of color and a very beautiful and subtle blending. 

Align the wool colors so that all the deeper shades are at one end, and the lightest shades at the other. You can fill in the remaining sheet of wool with white wool roving. 


Once you are happy with your arrangement, needle felt along the edges to keep the wool in place. Also needlefelt lightly along the rainbow, but don't over felt--you probably don't want it flat. 
For neater edges, fold the wool over the edges and needlefelt along the backside as well. 
Voila!


You may wish to sew a string to the back for hanging or sew or felt tabs and hang on a branch. I am going to seek out a white branch for my rainbow. 

Please let me know if you have any questions. And please share your result on my Facebook page, Claudia Marie Felt.