Showing posts with label how to needle felt. Show all posts

Monday, April 17, 2017

How to Needle Felt a Tiny Cardinal or Tiny Bird


I use tiny birds to decorate branches and little felt trees and some of my treetopper Waldorf angels hold little red cardinals. I created many little birds for my picturebook Seasons of Joy: Everyday is for Outdoor Play. 
In this blog post, I'll explain how to make a tiny red Northern Cardinal. You can also watch me make the cardinal in the YouTube video.

seasons picturebook

Learn to make the tiny cardinal like the one on cover of Seasons of Joy: Everyday is for Outdoor Play


Supplies 


    felt bird
  • orange wool
  • red wool
  • grey-brown wool or alpaca
  • black wool
  • toothpick
  • felting needle 38 or 40
  • sharp scissors


Wrap orange wool tightly around toothpick.


Wrap red wool over orange, wrapping in same direction.


Carefully slide off toothpick, felt with needle, and bend wool to shape bird.


Wrap small piece of red wool around head, and felt in.


Cut head crest to shape like cardinal.


Wrap tiny piece of black wool around beak and felt in, add red wool to create tail.


needlefelted bird

Blend red and gray wool, fold a tiny piece of the blended roving and felt in as wings.


Watch me make the cardinal in this YouTube video:


Waldorf angel with cardinals


Another angel tree topper with cardinals.


snowman building

The tiny cardinal in a Winter illustration from Seasons of Joy: Everyday is for Outdoor Play.


Thursday, April 30, 2015

How I Made Tiny Felt Food for Needle Felted Book Illustration

DIY Felt Food and Candy Ideas


I recently was at a book fair where a 5-year-old boy purchased Hansel & Gretel: A Fairy Tale with a Down Syndrome Twist.  I asked him which picture was his favorite. He told me he liked the candy houses because it looked like the candy was popping out of the page and he wanted to eat it. 

Fiber Art Book Illustration of Candy House
Easter Inspired Candy House in Hansel & Gretel: A Fairy Tale with a Down Syndrome Twist


It was gratifying to hear from a child that he connected with the 3-d illustrations. When Jewel Kats asked me to illustrate this book, I was immediately excited about the forest scenes, but I wasn't sure how to handle the candy houses. To be honest, I don't get particularly excited about candy, but I do like cakes, cookies, fruit. So with the gingerbread house, I added some window boxes with iced berries, chocolate chip cookie trim, and of course candy canes lining the entry. The other candy house (you have to read the story to find out why there are two) was created during Easter and you can see how that influenced the design, pastel M&Ms, lollipops and even Peeps on the lawn. 


Hansel Gretel Gingerbread House Book Illustration
Hansel eats a marshamallow off the Gingerbread House

Creating the sweets in both candy houses and for the feast scene was an exercise in trial and error. This is not a step-by-step tutorial, but I will share some tips and techniques I used. I hope you can be inspired and create some fun felt food.  

  • Fiber to Create Cake -- One of the most important tips for creating cupcakes, cakes, marshmallows, is to use a wool that is very springy and fluffy. I used Rambouillet. To be honest, I had picked up some Rambouillet from a fiber store and found that it wasn't useful for my needlefelt animals. However, it makes great cake dough. I used Rambouillet extensively in the pastel house and in the feast scene. 
  • Coffee is Great Cake Dye -- The Rambouillet was white, but if I soaked it in leftover coffee for a while, it turned the perfect beige shade. 
  • Felt Baked Goods -- The cinnamon roll in the feast scene was simply the Rambouillet and a cinnamon-colored wool rolled up together and held in place with a little needle felting. The cake slice was a bit more complicated. I layered rambouillet with a red wool in the middle, like a sandwich, and needle felted until it was dense, rolling a bit as well to keep it roundish. I finished with chocolate-colored alpaca as the icing and felted lightly, but firmly. When my cake was finished, I used very sharp scissors to cut a piece. 
  • BFL Silk Blend for Icing --The icing on the roofs and berries was created from a Blue-faced Leicester and silk blend. I wet the wool then tore off little pieces, which makes it curl. After placing it on the roof, I used hairspray to keep it in place. 
  • Waffle Irons make Waffle Cones -- I actually used a waffle iron to make the waffle cone and the waffle door. This didn't work out as well as I had hoped. I dyed some 100 percent wool felt the color of golden waffles. While it was still wet, I put it in the waffle iron. Do not put the waffle iron on! I pressed it in and let it sit in place for about a day. The indentations were not as deep as I had hoped, so I had to needle felt around the edges. 
  • Candy Canes and Lollipops -- At first I made the candy canes out of pieces of felt that I twisted and then inserted a wire. That didn't look so good. So then, I took a piece of copper wire, a thicker gauge, about 18, and wrapped it with white wool and then swirled the red wool. This made it easy to shape the cane. 

Needle Felt Book Illustrator Claudia Marie Lenart Felt Food
A felt food sweet table in Hansel & Gretel: A Fairy Tale with a Down Syndrome Twist
Needle felted food
BFL/Silk Icing over felted berries on Candy House


Fairy Tale Needle Felt Book Illustration
Marshmallows of Rambouillet wool on the tower

Have fun creating! I'd love to see what you come up with and you can share on Claudia Marie Felt on Facebook. 


Thursday, March 5, 2015

How to Make a Needle Felted Bunny


I have updated my needle felt bunny tutorial and I am now offering it in my Etsy store.

My new tutorial is very detailed. It is a 12-page instant download PDF with 64 photos.  


Here is the supply list:


• Foam or sponge
• Felting needles, 38 star or 40 spiral, optional 42 triangle for eye detail
• Multi-needle felting tool (optional)
• Ruler
• Toothpick (round and smooth)
• Wooden skewer or 18 gauge wire (optional)
• Scissors (not shown)
• Corriedale or other core wool
• Rose grey alpaca
• Fawn alpaca
• White alpaca
• Pink or blush wool
• Pink or brown wool for nose
• Black alpaca or wool
• Tiny piece white merino 


The bunny would take 2 to 4 hours to make and it can be accomplished by a beginner with basic needle felting experience. 

Check out my Needle felt Bunny Tutorial


DIY How to Needle Felt Bunny


This bunny is Copyright Claudia Marie Felt. Please use this tutorial for personal use and do not sell the bunny you create. Thank you!


And here is another book that might help you get started needle felting animals:


Monday, February 23, 2015

How to Create a Wool Fireplace for Wall Hanging or Doll Play

This wool fireplace was created as a needle felt book illustration for Hansel & Gretel: A Fairy Tale with a Down Syndrome Twist, by Jewel Kats. I am the illustrator.

Fiber Art Illustration by Claudia Marie Lenart


The fireplace was an enjoyable challenge. The background walls were created with a pressed wool technique. I added thin layers of Romney wool onto a piece of felt, then covered with a sheet of glass and pressed down. Leave the glass on the wool for a day, if time allows. The edges were needle felted. 


I began the hearth by finding images of fireplace designs. Once I settled on a design I drew the outline of the design on the wool with thin yarn. Then I filled in with a dark taupe wool. I needle felted a black arch in the hearth to create depth.


The rocks were made with a variety of wool, whatever I had handy in rock colors. Many of the grey rocks are a natural merino. I rolled the wool into a loose ball and needle felted with a few light pokes to keep it together. This was followed by placing the rocks in a sink filled with warm, soapy water. I wet-felted the rocks by rolling them in my hand, one by one, until they felt dense enough. After I squeezed out the excess water, I placed them in a pillowcase and put them in the clothes dryer. 

Next, start placing the rocks onto the fireplace and felt just around the edges. 
Create a mantle with a sheet of wool felt in a tan color. Measure the felt so it is the same width as the fireplace.  Roll the felt into a log shape and place the mantle above the rocks. Felt along the edges. Fill the ends of the log with some tan wool.  Continue adding rocks until finished. 


To create the fire in the hearth, I added some more black wool horizontally across the bottom. The fire was created with thin wisps of orange and yellow Blue-Faced Leicester wool, which has a natural sheen. 
Miniature fireplace made of wool stones.

You can decorate the fireplace with a tiny painting and props. To make tiny logs, roll a piece of tan wool tightly into a log shape, then roll a layer of darker brown over it. Needle felt until the log is very dense. With sharp scizzors cut off the ends or you can "split" the wood. 
Miniature needle felted logs made of wool.


If you decide to make a fireplace, I would love to see the results. You can share it on my Facebook page, Claudia Marie Felt.


Hansel & Gretel fairy tale illustrated in fiber art
Hansel & Gretel: A Fairy Tale with a Down Syndrome Twist

Thursday, February 12, 2015

Needle Felt Book Illustration — The Next Big Thing


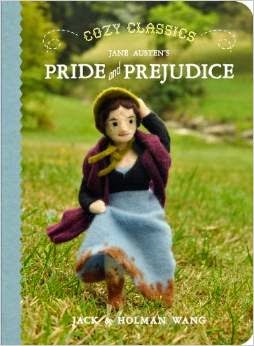
When I first embarked on this journey to illustrate a book in needle felt, I did a Google search to see if anyone else was doing this. After searching with a few different terms, the only illustrators I found were Cozy Classics.
The Cozy Classics author/illustrator team of Jack and Holman Wang created a series of board books for little children, based on classics like War &  Peace and Jane Eyre. Each book has just 12 words, and endearing needle felted characters posed both outdoors and in miniature settings.


I wanted to illustrate a book for author Jewel Kats almost completely in wool with wool backgrounds and characters. It was uncharted territory. Hansel & Gretel: A Fairy Tale with a Down Syndrome Twist is the second book I illustrated for Jewel. Loving Healing Press will publish the first later this year.  And, the third book is in progress. I am still in awe of Jewel who saw my needle felt animals in my Etsy shop and surmised that I could illustrate her book. 

Hansel & Gretel Illustrated by Fiber Artist Claudia Marie Lenart
Hansel & Gretel: A Fairy Tale with a Down Syndrome Twist


This week, I was thrilled to see some needle felt illustration make its way into the mainstream with the announcement of the Caldecott Medal Winners.  Caldecott Honor Winner 2015 Yuyi Morales includes some needle felted characters in her book Viva Frida. Morales, who is an innovative illustrator and accomplished artist, uses a variety of media to tell the story of artist Frida Kahlo. 

Viva Frida by Yuyi Morales


I was also delighted to discover that Viva Frida and Hansel & Gretel: A Fairy Tale with a Down Syndrome Twist  have something in common. Both books include a needle felted deer.


Needle felt book illustration by Claudia Marie Lenart

Another wonderful surprise this week, was the Google Doodle. While working in my Chrome browser, I noticed the doodle and immediately recognized that it was needle felt. The Google Doodle celebrating Laura Ingalls Wilder’s 148th birthday was created by Cozy Classics. What a thrill! The Doodle page also has a nice explanation of how the characters were created, which is similar to how I created mine. 


I was speaking to Loving Healing Press Publisher Victor Volkman about the trend of needle felt illustration this week and he had an interesting perspective. It's all about the 21st century revolt against mass-produced products and return to the handmade ethos,” he said.

The needle felt characters have a special quality. I think creating with fiber gifts from animals gives life to the characters.

Illustrating with needle felt is a slow process. Hours go into creating each character. The backgrounds I created are akin to creating little movie sets. When it’s all done, the photography is quite a project. More hours go into posing each character perfectly, a slight twist of the head can change a smile into a frown. But the process is invigorating and be sure you will see more from me.

And a side note: Cozy Classics is working on a Star Wars series with Lucas Films/Disney. Looking forward to that!